Hello everyone! I’m writing this blog post since I finally managed to install AMS on my MacBook Pro with macOS 10.14 Mojave installed. The unhappy news is that I do not know how to use it now!But let’s focus on the good news for now!
I did not make any particular “move” if I recall correctly.
This is more like a working-in-progress guide, since I am not 100% sure this will work (I think yes though). Anyway, the steps I followed are these one: (step-zero is to clone the metamage_1 repository: https://github.com/jjuran/metamage_1 and cd into it)
- Install Xcode 9.4.1 (this might help: https://medium.com/@hacknicity/working-with-multiple-versions-of-xcode-e331c01aa6bc)
- Choose Xcode 9.4.1 Command Line Tools in Preferences
- Reboot (it’s always fine to do that)
(3.1) Try to make the install... it could possibly work make ams-osx
- Run the following: sudo installer -pkg /Library/Developer/CommandLineTools/Packages/macOS_SDK_headers_for_macOS_10.14.pkg -target /
- Finally do
make ams-osx
- [update] Ok... well it is not the end, yet! Check the next section to actually install it and try a sample program too :)
You should not get any errors. An app called MacRelix should run and you should see a Welcome window. Just click on it to close it.Here there are some screenshot I made.
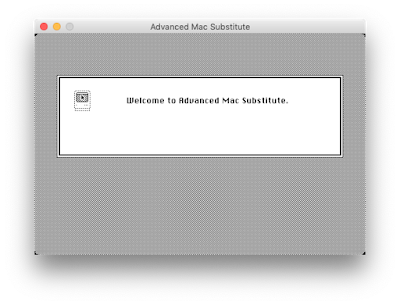 |
| The Welcome screen |
 |
| The Terminal window after the installation |
 |
| About MacRelix.app |
If you are asking yourself why Xcode 9 is needed, it is because it is the last version of Xcode (9.4.1 is the latest) which permits to build 32-bit macOS applications. And it is available for macOS Mojave. Read Xcode 10 Release Notes – Deprecations, 6th point.This was my thought anyway. It could be even not needed... who knows ¯\_(ツ)_/¯
Installation
Welcome again!
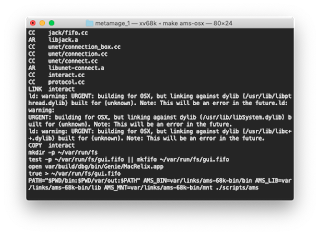
Do you remember the “bad news”? Well, finally I managed (thanks @jjuran) to actually install ams and test the sample application: Tic-tac-toe.Let me explain you how...First of all, if you managed to “make” the project, now you can install it. To install it, you simple have to run: sudo make ams-osx-install and enter your password. (Always inside the metamage_1 directory.)You will get some output, then you will be able to run AMS (anywhere) by running ams Enter. (see the screenshot below).
When you launch MacRelix.app as requested, you will get the original Welcome screen you got earlier in the process. Cool, isn’t it?!Let’s try to run a sample app included in AMS, Tic-tac-toe.
Close the Welcome screen by clicking on it. Then run AMS_APPNAME=Tic-tac-toe (Enter), then export AMS_APPNAME. Now run ams again – plus MacRelix app – and you will get the Tic-tac-toe game running.
Troubleshooting
If you get this after a successful installation
MBP-di-Umberto:metamage_1 umberto$ ams
-bash: ams: command not found
Chances are you cloned the metamage_1 repo before it was fixed. In this case, just follow this tip:
Links:


